- Cylance Endpoint Security requirements
- Requirements: Cylance console
- Requirements: CylancePROTECT Desktop
- Requirements: CylanceOPTICS
- Requirements: CylancePROTECT Mobile app
- Requirements: BlackBerry Connectivity Node
- Requirements: CylanceGATEWAY Connector
- Requirements: CylanceGATEWAY agents
- Requirements: CylanceAVERT
- Cylance Endpoint Security network requirements
- Cylance Endpoint Security proxy requirements
- Logging in to the management console
- Installing the BlackBerry Connectivity Node
- Linking to your company directory
- Setting up administrators
- Adding users and devices
- Enrolling CylancePROTECT Mobile and CylanceGATEWAY users
- Setting up zones to manage CylancePROTECT Desktop and CylanceOPTICS
- Setting up CylancePROTECT Desktop
- Testing your CylancePROTECT Desktop deployment
- Using device policies to manage CylancePROTECT Desktop devices
- Installing the CylancePROTECT Desktop agent for Windows
- Installing the CylancePROTECT Desktop agent for macOS
- Installing the CylancePROTECT Desktop agent for Linux
- Require users to provide a password to remove the CylancePROTECT Desktop agent
- Setting up CylancePROTECT Mobile
- Setting up CylanceOPTICS
- Setting up CylanceGATEWAY
- Defining your private network
- Setting up the CylanceGATEWAY Connector
- Install the CylanceGATEWAY Connector to a vSphere environment
- Install the CylanceGATEWAY Connector to an ESXi environment
- Prerequisites to install CylanceGATEWAY Connector to a Microsoft Entra ID environment
- Install the CylanceGATEWAY Connector to a Microsoft Entra ID environment
- Install the CylanceGATEWAY Connector to a Hyper-V environment
- Install the CylanceGATEWAY Connector to an AWS environment
- Configure the CylanceGATEWAY Connector in the VM environment
- Access the CylanceGATEWAY Connector using OpenSSH
- Configure your firewall for the CylanceGATEWAY Connector
- Enroll the CylanceGATEWAY Connector with the BlackBerry Infrastructure
- View details for an enrolled CylanceGATEWAY Connector
- Configure the CylanceGATEWAY Connector
- Managing CylanceGATEWAY Connectors
- Manage CylanceGATEWAY Connectors
- Update a CylanceGATEWAY Connector
- UDP connectivity test responses
- Specify your private network
- Specify your private DNS
- Specify your DNS suffixes
- Specify private CylanceGATEWAY agent IP ranges
- Bring your own IP addresses (BYOIP)
- Setting up the CylanceGATEWAY Connector
- Network Address Translation with CylanceGATEWAY
- Define network services
- Controlling network access
- Configuring network protection
- Searching ACL rules and Network Services
- Using source IP pinning
- Configuring the Gateway service options
- Gateway Service policy parameters
- Configure Gateway service options
- Specifying how devices activated with an EMM solution use the CylanceGATEWAY tunnel
- Specify which apps use CylanceGATEWAY on iOS devices
- Specify which apps use CylanceGATEWAY on iOS devices in a Microsoft Intune environment
- Specify CylanceGATEWAY options on Android Enterprise devices
- Specify CylanceGATEWAY options on Chromebook devices
- Specify CylanceGATEWAY options on Android Enterprise devices in your Microsoft Intune environment
- Connecting Cylance Endpoint Security to MDM solutions to verify whether devices are managed
- Installing the CylanceGATEWAY agent
- Defining your private network
- Setting up CylanceAVERT
- Managing updates for the CylancePROTECT Desktop and CylanceOPTICS agents
- Connecting Cylance Endpoint Security to external services
- Appendix: Best practices for deploying CylancePROTECT Desktop on Windows virtual machines
Bulk import of device control exclusions
Administrators can use a .csv file to import device control exclusions in bulk (up to 500 exclusions per file). For details about the formatting requirements and to download a sample template, visit support.blackberry.com to read KB 65484.
Download the device control exclusion .csv template
- In theDevice Controltab of a device policy, enable Device Control.
- ClickImport Exclusions.
- Clickdownload our templateand save the file.
- Modify the template according to the formatting requirements.
Import a .csv file with the device control exclusions
- In theDevice Controltab of a device policy, enable Device Control.
- ClickImport Exclusions.
- ClickBrowse for CSV files to importand select the .csv file that you want to import.
- ClickUpload.
Formatting requirements of the .csv file
- Only .csv files are accepted.
- The column header information is required in the .csv file. The import function ignores the first line of the .csv file. If the first line in the import file is an exclusion, it will not be imported. The column headers must be in the following order:
- Vendor ID
- Access
- Product ID
- Serial Number
- Comment
- Vendor ID and Access fields are required for each exclusion.
- Product ID, Serial Number, and Comment fields are optional for each exclusion.
- The Access column requires eitherFull Access,Read Only, orBlockas the value, and only accepts the values in English.
- The Comments column does not support commas (,).
Example:
Bulk import using a spreadsheet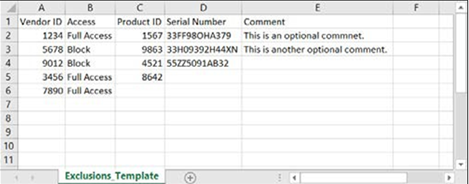
Example:
Bulk import using a text editor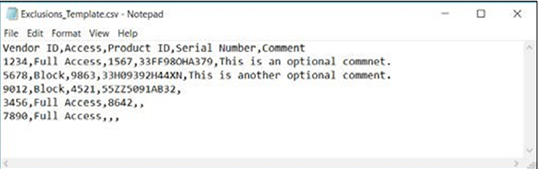
Limitations
- The maximum number of exclusions per .csv file is 500. If you try to import a file that contains more than 500 exclusions, an error message displays.
- The maximum number of device control exclusions per policy is 5000. A warning message should display if this number is exceeded.
- f you are using a device that doesn't have its language set to English, you might need to set the options to UTF-8 and comma separated when you import and edit the template withMicrosoft Excel. If you open the file without changing the options, it may show unrecognizable characters.