Create a dynamic hierarchy attribute
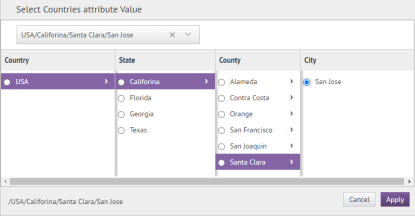
Create a dynamic hierarchy attribute when you have multiple levels of values (nodes) that are connected. For example: State, City, and Work Location. When an operator or end user selects a dynamic hierarchy attribute, they can step through a selection of levels (nodes) within the attribute. When a user selects an attribute node, the next available selections are dependent on the selected node. The following is a sample dynamic hierarchy attribute used in a user profile:
You must be an Enterprise Administrator, Organization Administrator, Alert Manager or Advanced Alert Manager to create or manage a dynamic hierarchy attribute.
Dynamic hierarchy attributes can be used in these areas:
- User Details pages in theBlackBerry AtHocmanagement system
- My Profile pages in Self Service
- Advanced queries when selecting targeted users in an alert or alert template
- Advanced queries when selecting affected users in an accountability event or template
- Advanced queries when selecting an accountability officer in an accountability template
- Accountability event summaries
- Advanced queries in the Users manager
- Advanced queries for selecting operators in a static distribution list
- Selecting membership criteria for a dynamic distribution list
- Configuring automatic deletion or disabling of users
- Configuring user base restrictions
Dynamic hierarchy attributes cannot be used as response options.
When you try to delete a dynamic hierarchy attribute that is currently being used, a pop-up box appears, listing all areas where the attribute is in use. You must remove the attribute from each of the dependencies manually before you can delete the attribute itself.
Deleting levels and nodes from a dynamic hierarchy attribute can be done only from the bottom up.
Level and node names can be updated. When a level or node name is changed, it is updated automatically anywhere the attribute is being used.
Bulk-clear for all users is available for dynamic hierarchy attributes.
- In theBlackBerry AtHocclickUsers>User Attributes.
- On theUser Attributesscreen, clickNew>Dynamic Hierarchy.
- On theNew Attributescreen, in theNamefield, enter the name that will be displayed when the attribute appears in lists or fields in theBlackBerry AtHocmanagement system or Self Service. The attribute name has a 128 character limit.
- Optionally, enter text in theTooltip,Help Text, andCommon Namefields. For details, see Create a user attribute.
- Optionally, selectUsers Can UpdateandMandatoryas needed. For details, see Create a user attribute.
- In theCreate and Modify Hierarchysection, clickAdd Level. You can add up to 8 levels.
- In theAdd Level Namefield, enter a name. Level names must be unique.
- In theCreate and Modify Hierarchysection, clickAdd Nodeto add a new node to the hierarchy. Select an existing node and clickAdd Nodeto add a new node under it.
- A maximum of 500 nodes can be added per level.
- Nodes names must be unique.
- Node names have a 50 character limit and cannot contain double slashes (//).
- All new and modified nodes are displayed in italics until saved.
- Optionally, to edit a node name, double-click on the node name and type your changes.
- Optionally, to delete a node, select the name and clickDelete Node.
- Optionally, to revert your changes, clickRemove Changes.
- ClickSave.
- Repeat steps 6-12 to add additional levels and nodes.
- Optionally, clickImport Hierarchyto import the attribute values from a CSV file. The import CSV file must include columns for the node paths and node names. Each column must include a value. The first level in each path must be the root node and represented with a forward slash (/.)
- Optionally, clickExport to CSVto export the attribute values to a CSV file.
- Optionally, in thePage Layoutsection, select the pages and sections where the user attribute appears. For each page listed in the section, click the drop-down list and select the location the user attribute appears or selectDo not showto avoid having it appear anywhere on the corresponding page.
- Optionally, in thePersonnel Reportssection, select theEnabledoption and then enter a name and description. The report is available to view inReports>Personnel.
- ClickSave.