You can also migrate the custom authentication settings for the following external IDPs:
- Entra (SAML)
- Ping Identity (SAML)
- OneLogin (SAML)
- Custom (SAML) You can select this option to migrate your external IDP if the IDP is not available in the authenticator drop-down list.
You can configure the authenticator using one of the following two methods. BlackBerry recommends that you use the secure method to set up the authenticator for Cylance Endpoint Security. You can configure using the easy method first and switch to the secure method later. However, if you change the configuration method and you have configured your authenticator to require users to validate their email with a one-time code, users will need to validate again the next time that they sign in after the change.
- Easy: This configuration method uses the email address for both identifiers (Federated ID and email address) and is the same configuration that is used by the legacy method. In this method, the email address is used as an identifier, but has some risk because the email address can be changed for a user, which can cause the authentication to fail.
- Secure: This configuration method provides enhanced security and more options to secure users’ sign in to the management console. This method requires additional time to set up and uses the following two values to identify users:
Federated ID: The Federated ID is a unique value that is used to link the user in Okta and the management console.
Email address: The Email address ensures the correct user is signing in to the management console. It is obtained from the “email” claim in the SAML response.
Important: The Okta IDP configuration and the Cylance Endpoint Security authenticator configuration must match the claim names to allow the management console to retrieve the users’ credentials. If they do not match, users cannot sign in to the management console.
The following tasks walk you through the Easy configuration method.
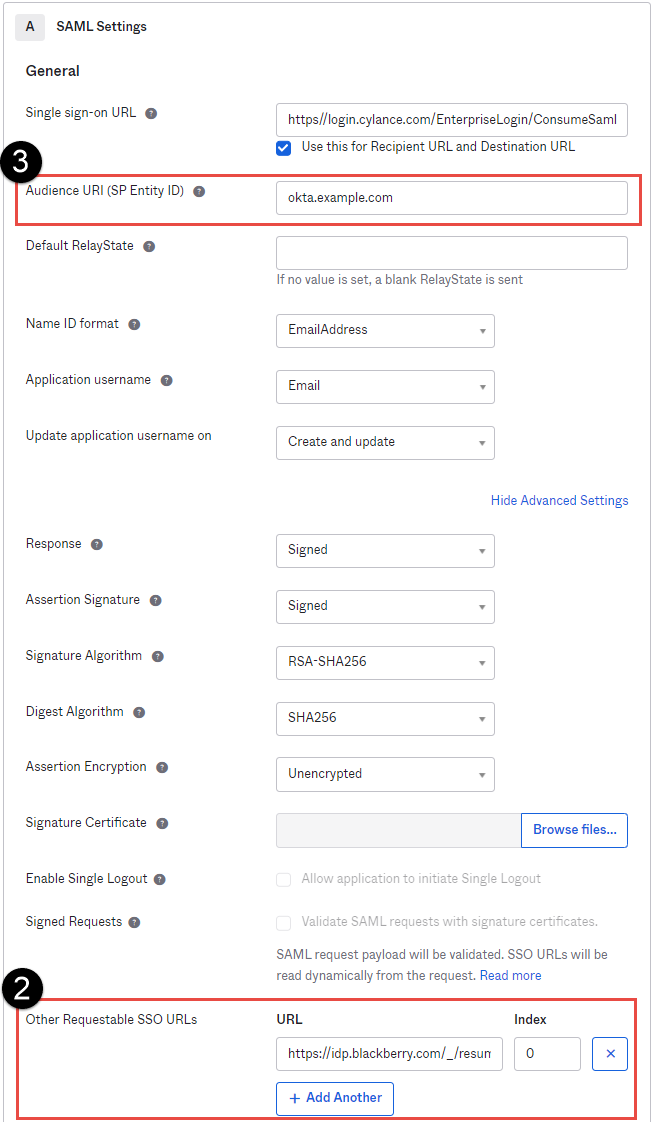
1. Configure Okta to communicate with Cylance Endpoint Security
In your Okta administration console, you must add a new single sign-on URL for Cylance. Add https://idp.blackberry.com/_/resume
By default, the Cylance management console requires all SAML responses to include the user’s email addresses. Important: The email addresses in Okta must match the addresses that are registered in the Cylance management console.
In this example, we are adding the new single sign-on URL to the existing list of URLs.
In the image, the numbers correspond to the Step number in the procedure; not all steps are represented in the image.
- In the Okta administration console, open your existing SAML application and update the SAML settings.
- Add the new single sign-on URL to the list as a secondary option. In the Other Requestable SSO URLs, URL field, enter https://idp.blackberry.com/_/resume and leave the Index at 0 (see the image to the left). BlackBerry does not send an index.
- Record the Audience URI (SP Entity ID). We will be checking it against the Authenticator configuration in the Cylance console in the next step (see the image to the left).
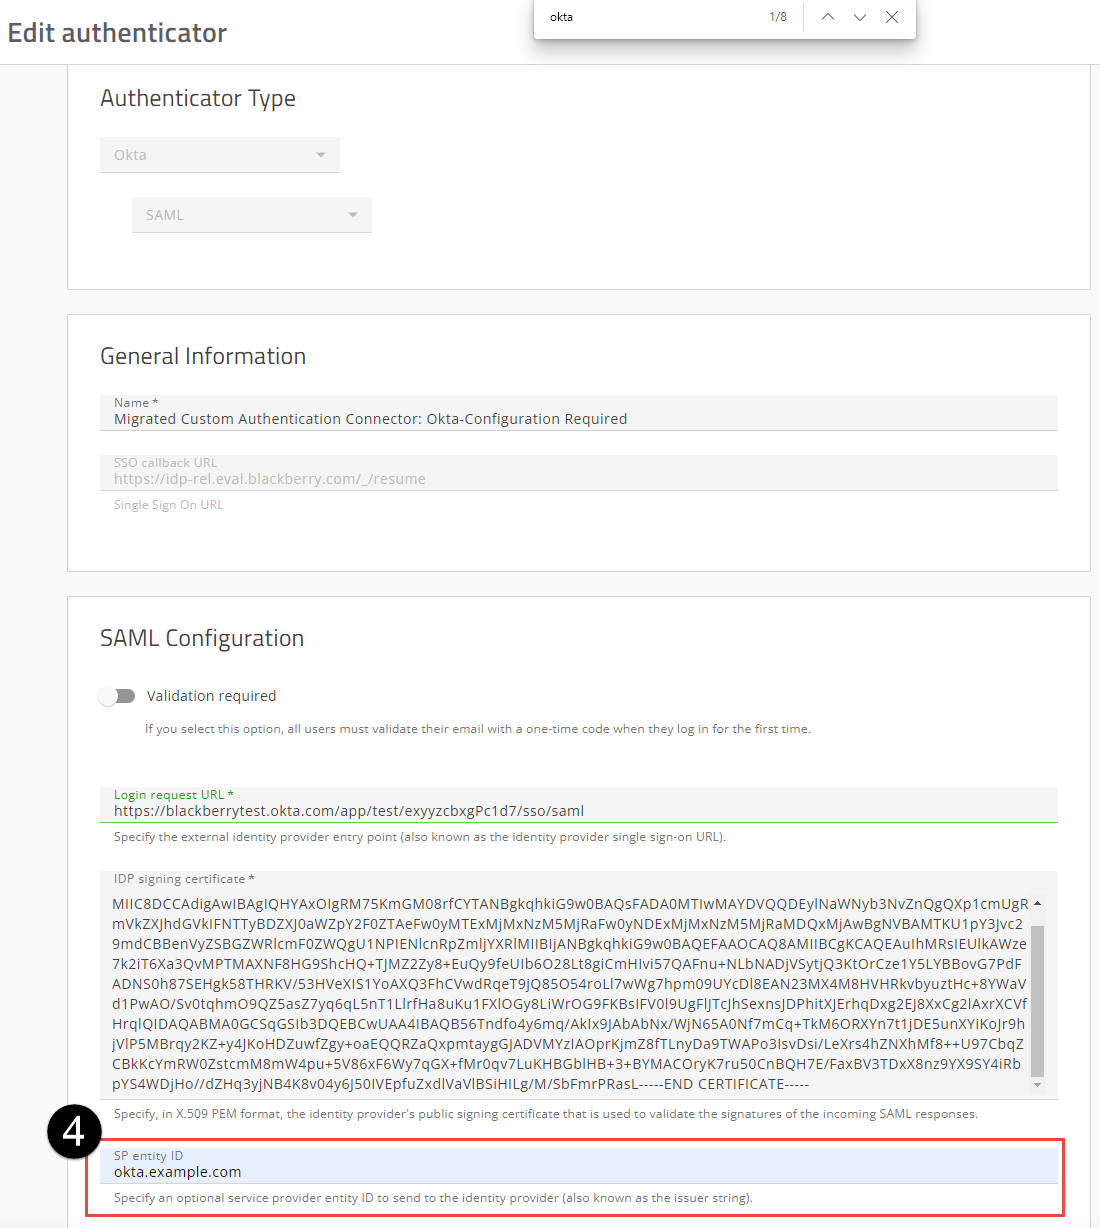
2. In the Cylance console, update the "Migrated Custom Authentication Connector: Okta-Configuration Required" authenticator.
- Sign in the to Cylance console.
- On the menu bar, click Settings > Authentication.
- Open Migrated Custom Authentication Connector: Okta- Configuration Required.
- In the SP Entity ID field, verify that the value matches the value you recorded in the Audience URI (SP Entity ID) field in the Okta console. If it does not match, change the SP Entity ID field in the Cylance console to match the Audience URI (SP Entity ID) field in Okta.
- (Optional) Change the Name of this Authenticator in the Cylance console. The name can be anything you deem appropriate. BlackBerry recommends that you at least remove the “Configuration Required” text from the name.
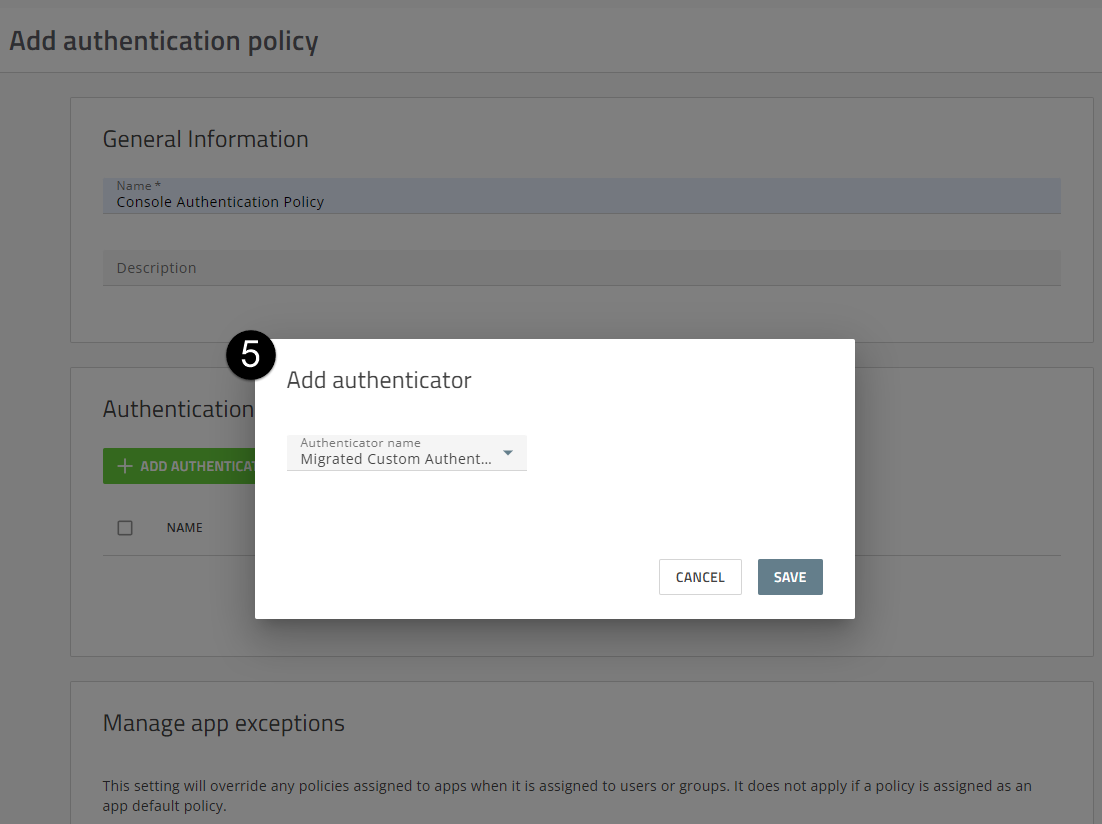
3. Create an authentication policy and assign it to users and groups.
Create a policy that includes the required authenticators for your environment. You can create a user policy or add the authenticator to the default authentication policies for the console, CylancePROTECT Mobile app or CylanceGATEWAY agent. Assign the policy to one administrator to verify the sign in policy is functioning as expected. You can then assign the authentication policy to your users.
In the image, the numbers correspond to the Step number in the procedure; not all steps are represented in the image.
- On the menu bar, click Policies > User Policy.
- Click the Authentication tab.
- Click Add Policy.
- Enter a name and description for the policy (for example, Console Authentication Policy).
- In the Authenticator rules section, click Add Authenticator. In the Add authenticator dialog box, select the “Migrated Custom Authentication Connector: Okta - Configuration Required” authenticator or find the name that you changed the Authenticator to in the last step (see image to the left).
- Click Save.
- To create the authentication policy, click Save.
- Assign the policy to one administrator and then verify the sign in is working as expected. Complete the following steps:
a. In the Assign the authentication policy dialog box, click Yes.
b. Click Add User or Group.
c. Start typing a name to search for the user that you want to add.
d. Select the user from the search results.
e. Click Add.
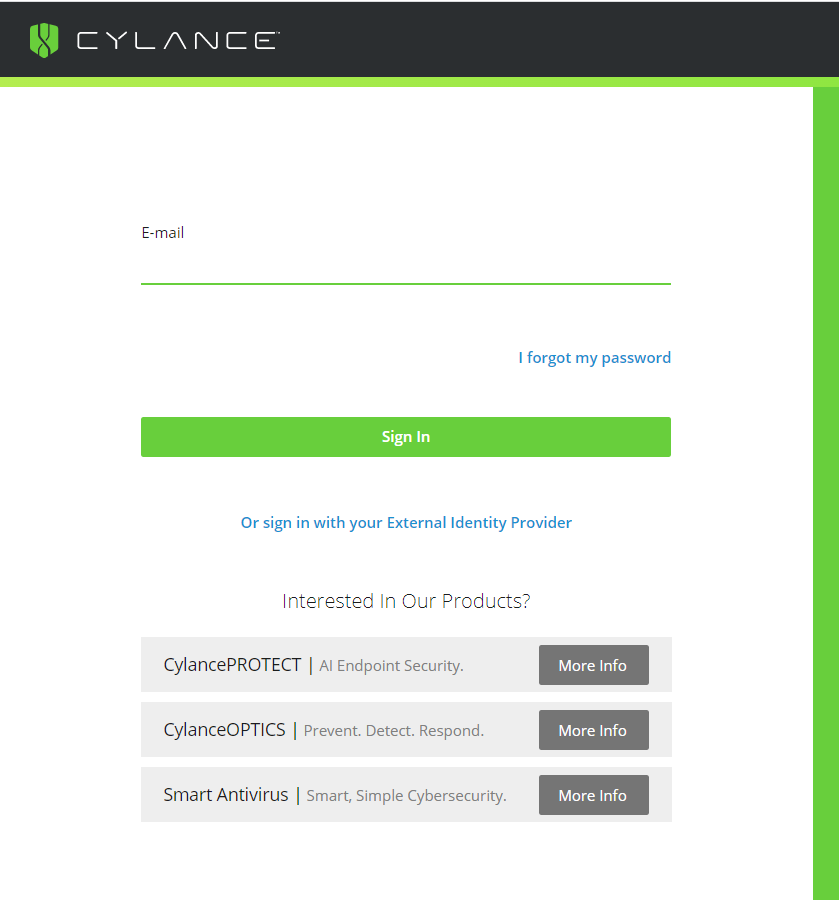
f. Log out of the console, or open an In Private window and access the Console log in page
g. Enter the email address of the administrator that you assigned the authentication policy to above and click Sign In.
h. When prompted, enter your credentials from Okta.
i. Complete the sign in with your Okta credentials and verify that the administrator can successfully sign in to the Cylance console.
For more information on additional authentication policy settings, see Create an authentication policy.
Important: Make sure that the Allow Password Login check box (Settings > Application > Custom Authentication) is selected. This option allows you to log in to the console directly and use SSO. If this option is not enabled before you test your SSO settings, users cannot sign in to the console using SSO. For more information on managing authentication policies, see Manage authentication polices for your tenant.
Optionally, it is recommended that you create a user policy (User policy > Authentication) that requires only a Cylance console password and assign it to one or more designated administrators. You should use a strong password for the user policy. You can use this policy as a failsafe while you migrate Okta to an authenticator.
That's it!
You have successfully configured an Okta SAML authenticator based on the existing custom authentication and assigned the authentication policy to users and groups.
Users can now sign-in to the Cylance console using their Okta credentials from the sign-in page.
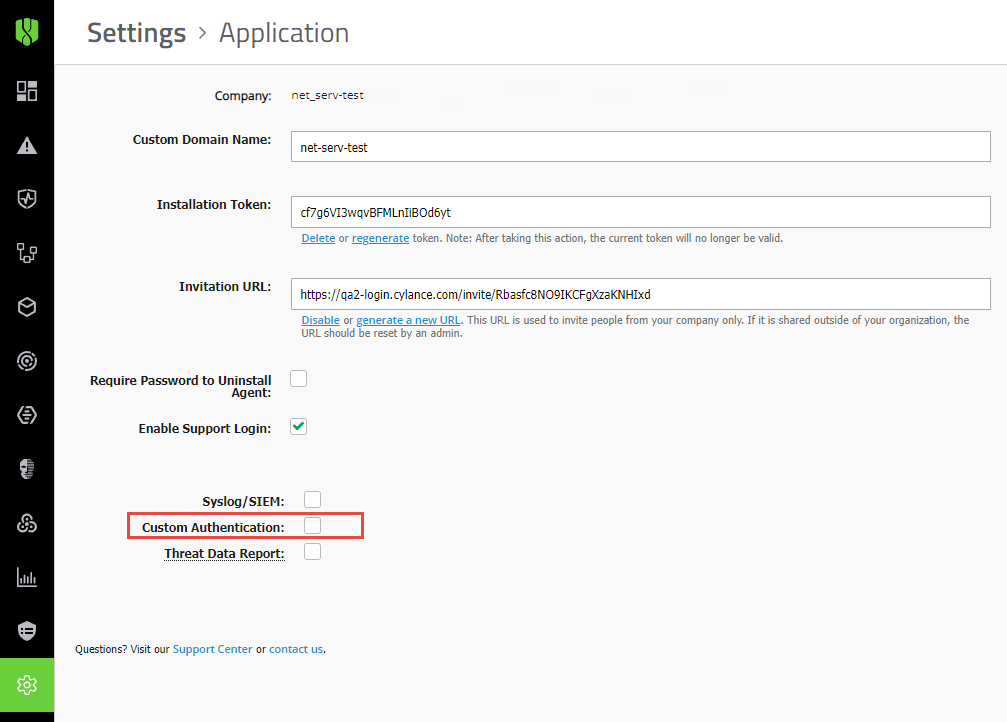
Next steps: Disable Custom Authentication.
After you have verified that you can sign in to the Cylance console from the primary login page using your Okta credentials, you can go to Settings > Application and clear the Custom Authentication check box.
Sign out and sign in to the Cylance console from the sign-in page using the administrator account with the new authentication policy that was applied in step 3 of this workflow and your Okta credentials.
Warning: Make sure that you sign in to the Cylance console from the primary sign-in page using you external IDP credentials. If you test the sign in from the “Or sign in with your External Identity Provider” page and then Disable Custom Authentication, you may become locked out of the console.
BlackBerry recommends you secure the Administrator account that you created with the password-only policy by assigning the Okta policy or changing the password-only policy to add an OTP code for better security.
BlackBerry recommends that you use the secure method to set up the authenticator for Cylance Endpoint Security. For more information about migration your custom authentication settings to an authenticator using the secure method, see the Cylance Endpoint Security Setup Guide.