If you have configured your environment with enhanced authentication, no additional action is required.
You can configure the authenticator using one of the following two methods. BlackBerry recommends that you use the secure method to set up the authenticator for Cylance Endpoint Security. You can use the easy method first and switch to the secure method later. However, if you change the configuration method and you have configured your authenticator to require users to validate their email with a one-time code, users will need to validate again the next time that they sign in after the change.
- Easy: This configuration method uses the email address for both identifiers (Federated ID and email address) and is the same configuration that is used by the Legacy method. In this method, the email address is used as an identifier, but has some risk because the email address can be changed for a user, which can cause the authentication to fail.
- Secure: This configuration method provides enhanced security and more options to secure users’ sign-in to the management console. This method requires additional time to set up and uses the following two values to identify users:
Federated ID: The Federated ID is a unique value that is used to link the user in Okta and the management console.
Email address: The Email address ensures the correct user is signing in to the management console. It is obtained from the “email” claim in the SAML response.
If you need to configure your Okta environment for enhanced authentication or want to use the IDP-initiated Proxy feature which allows you to use single sign-on (SSO) to access the Cylance console after logging into Okta, you must complete the following steps:
1. In the Okta environment, complete the following:
a. Create a new application.
b. Configure Okta to communicate with Cylance Endpoint Security.
2. In the Cylance console, completer the following:
a. Add a new authenticator.
b. Add an authentication policy.
c. Assign the authentication policy to users.
3. In the Okta environment, update the Reply URL with the SSO Callback URL that you generated in the Cylance console.
This workflow provides an example of how you might configure your Okta environment to communicate with the Cylance console and allow users to sign in to the console using single sign on.
Important: The Okta configuration and the Cylance Endpoint Security authenticator configuration must match the claim names to allow the management console to retrieve the users’ credentials. If they do not match, users cannot sign in to the management console.
In this configuration, you will be required to record information in the Okta portal that is required in the Cylance console to allow Okta to communicate with Cylance Endpoint Security. The following table lists the settings that you will record from the Okta portal and the corresponding setting in the Cylance Console.
The following information will be recorded and must match between the Cylance console authenticator and Okta environment, respectively.
Cylance Console authenticator |
Okta portal |
| Single Sign On or SSO Callback URL The Single Sign On or SSO Callback URL is generated when the Authenticator is added. The URL will be in the format of <IDP>/_/resume/saml20/<hash> |
Single sign-on URL |
Login Request URL |
Identity Provider Single Sign-On URL |
SP Entity ID |
Audience URI (SP Entity ID) |
Name ID format |
Name ID format |
IDP signing certificate |
X.509 SAML Signing Certificate |
IDP entity ID |
Identity Provider Issuer |
The following tasks walk you through the Easy configuration method.
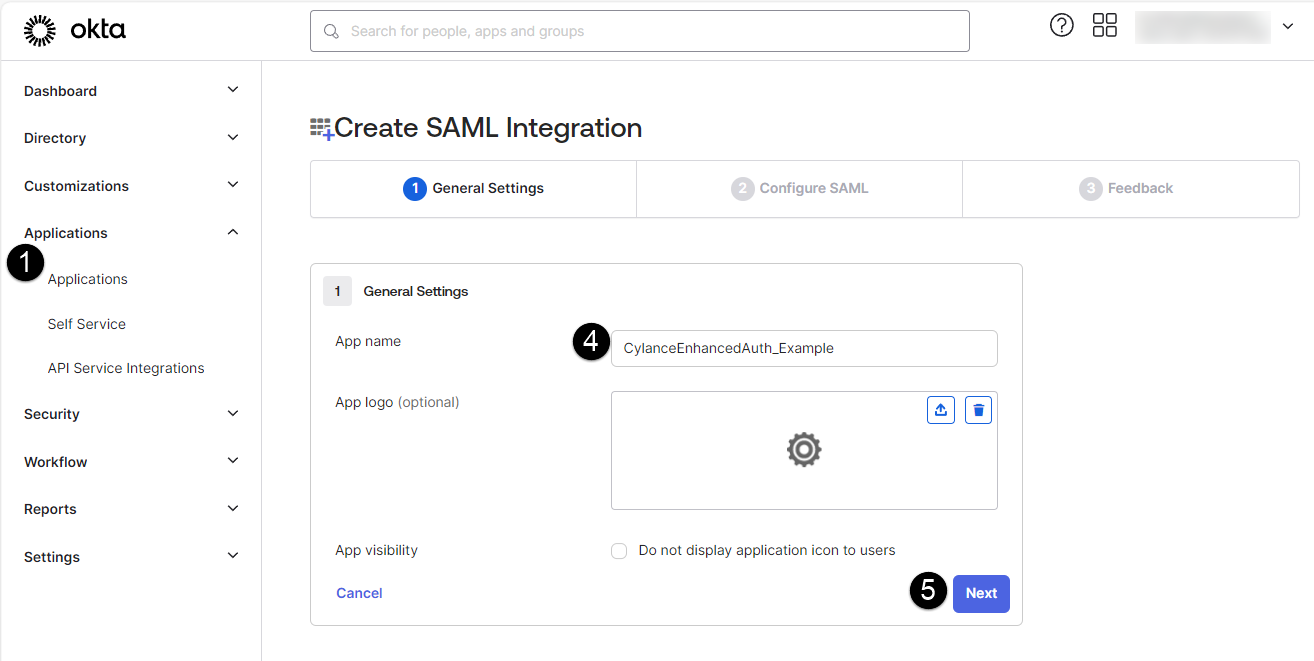
1. In the Okta portal, create a new application.
In your Okta portal, create an application that will be used to communicate with the Cylance console.
- In the Okta administration console, on the menu bar, click Applications > Applications (see image to the left).
- Click Create App Integration.
- Select SAML 2.0.
- Type a name for your application. In this example, we will use the name CylanceEnhancedAuth_Example (see image to the left).
- Click Next (see image to the left).

2. Configure Okta to communicate with Cylance Endpoint Security.
The Cylance management console requires all SAML responses to include the user’s email addresses. Important: The email addresses in Okta must match the addresses that are registered in the Cylance console.
The Email address ensures the correct user is signing in to the management console. It is obtained from the “email” claim in the SAML response.
In the image, the numbers correspond to the step number in the procedure; not all steps are represented in the image.
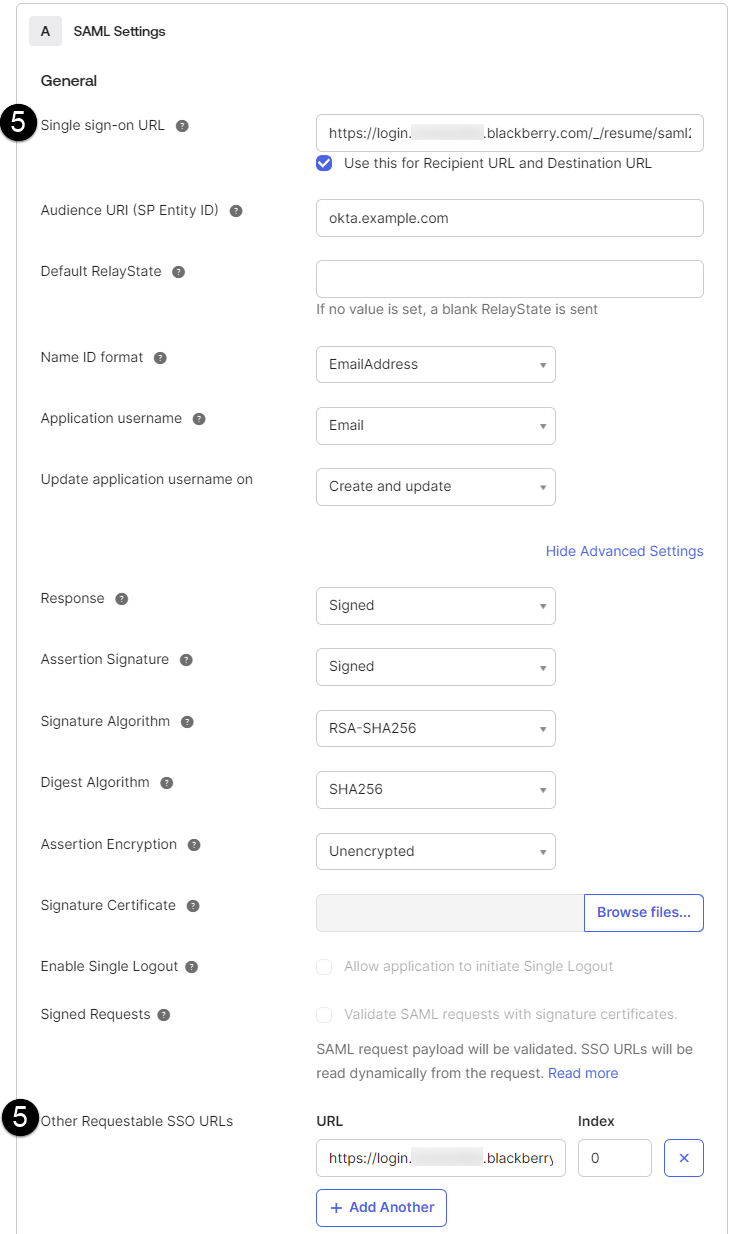
1. In the Single sign-on URL field, enter the placeholder URL, https://ChangeMe.Cylance.com (see image to the left).
The Single Sign-on URL or “SSO callback URL” will be generated in the Cylance console when you add the authenticator in the next step. This URL will be updated in a later step. Important: If you do not update the URL, the browser will display an error indicating that the server's IP address could not be found.
2. In the Audience URI (SP Entity ID) field, specify a string to identify the application (for example okta.example.com). The value can be any string. Make sure it is unique and persistent to avoid any issues if your organization changes topologies or service providers.
This value will be used in the Cylance console for the SP Entity ID in the authenticator configuration in the next step. If the Audience URI (SP Entity ID) and SP Entity ID do not match, the authentication request fails (see image to the left).
3. In the Name ID format field, click the dropdown and select Persistent. This value will be used in the Cylance console for the “Name ID format” in a later step.
4. In the Application username field, click the dropdown and select Custom and in the custom rule field, enter user.getInternalProperty("id").
5. If necessary, a new single sign-on URL to the list as a secondary option. In the Other Requestable SSO URLs, URL field, enter the placeholder https://idp.blackberry.com/_/resume and leave the Index at 0 (see the image to the left). BlackBerry does not send an index.
6. Click Show Advanced Settings.
7. In the Attribute Statements section, complete the following steps:
a. In the Name field, type Email. In the Value field, type user.email.
b. Click Add another.
c. In the Name field, type adGUID. In the Value field, type findDirectoryUser().externalId.
8. Click Next.
9. Follow the onscreen prompts. Click Finish.
10. Click View SAML setup instructions, and complete the following:
• Copy the Identity Provider Single Sign-On URL. This will be used as the “Login Request URL” in the Cylance console.
• Copy the Identity Provider Issuer. This value will be use as the IDP Entity ID in the Cylance console.
• Download a copy of the SAML signing certificate. In the X.509 Certificate section, click Download certificate. In an editor, open the file and copy the body of the signing certificate including the Begin Certificate and End Certificate lines. When you copy the body of the certificate, make sure that you don't alter any line breaks or the format of the certificate information. This is used as the IDP signing certificate in the Cylance management console.
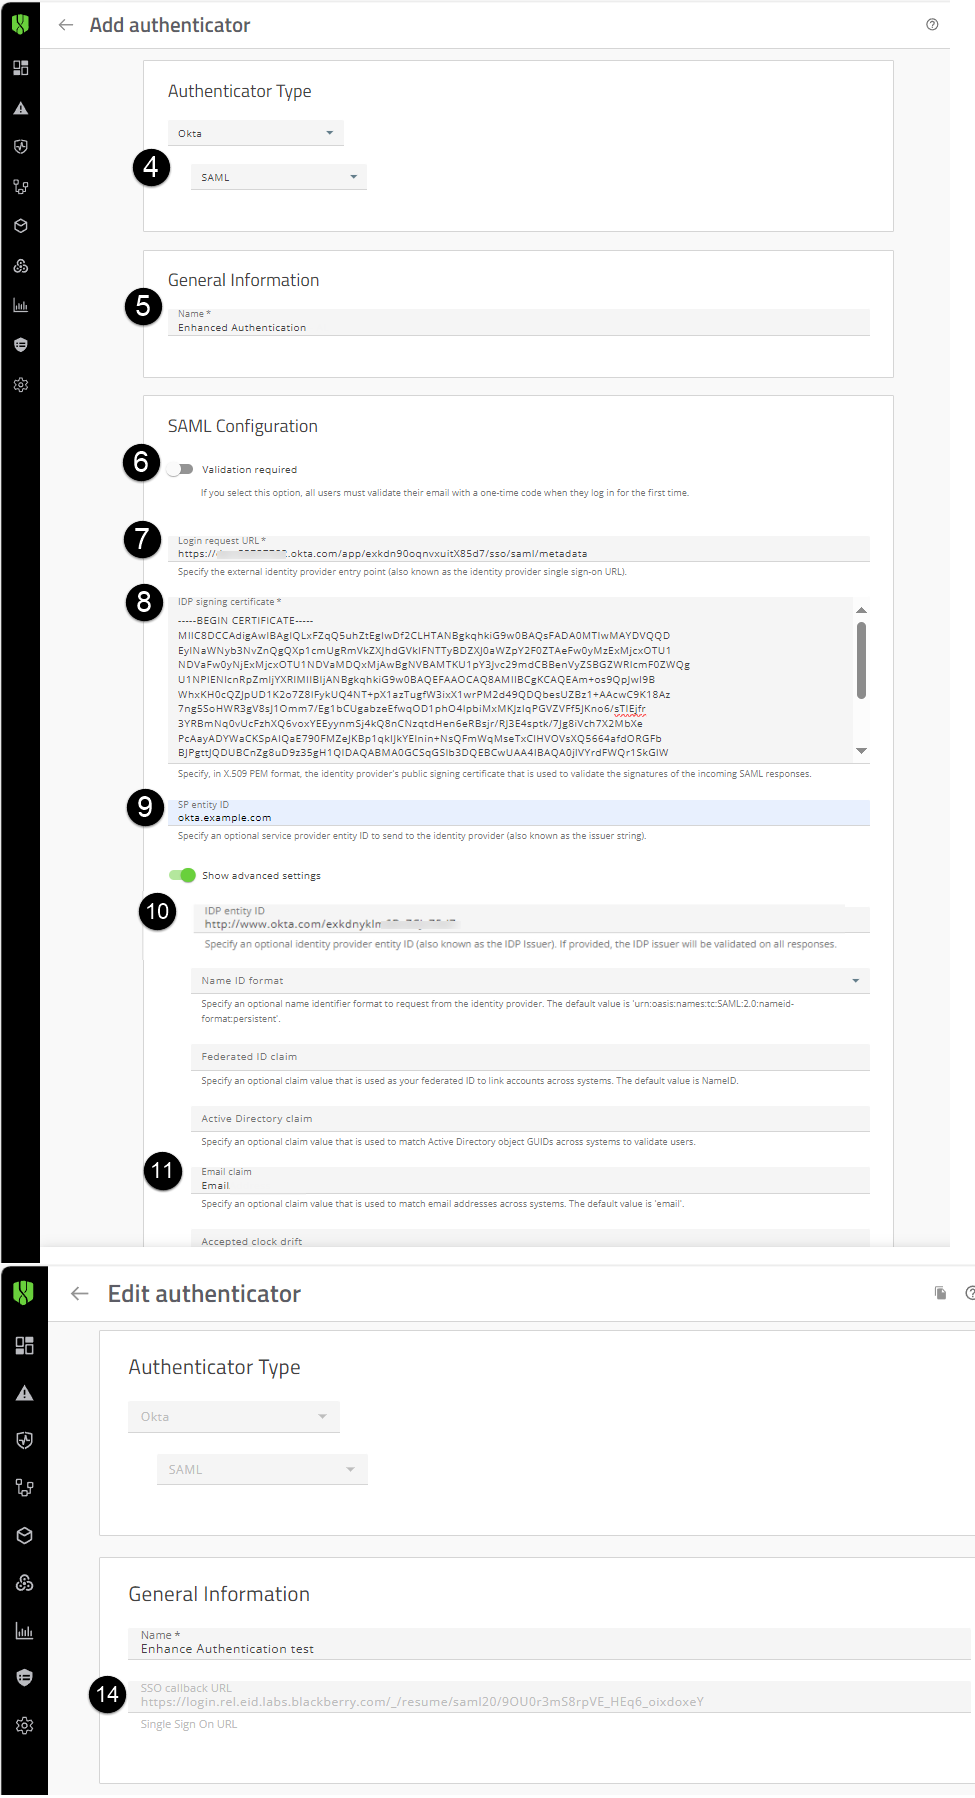
3. In the Cylance console, add the Authenticator.
The Single Sign-on URL or SSO Callback URL is generated when you add the authenticator.
In the image, the numbers correspond to the step number in the procedure; not all steps are represented in the image.
1. Sign in to the Cylance console.
2. On the menu bar, click Settings > Authentication.
3. Click Add Authenticator.
4. In the Authenticator Type drop-down list, select Okta (SAML) (see image to the left).
5. Enter a name for the authenticator (for example. Enhance Authentication) (see image to the left).
6. Optionally, if you want users to validate their email with a one-time code when they log in for the first time, turn on Validation required. The code is sent to the email address that is associated with the user in your tenant (see image to the left).
7. In the Login request URL field, enter the “Identity Provider Single Sign-On URL” that you recorded in step 2 (see image to the left).
8. In the IDP signing certificate field, paste the “Signing Certificate” that you downloaded from the Okta portal in step 2. When you paste the body of the certificate, make sure that you don't alter any line breaks or the format of the certificate information (see image to the left).
9. In the SP Entity ID field, type the “Audience URI (SP Entity ID)” that you recorded in the Okta portal in step 2. This field is required, and the value that you enter must match (see image to the left).
10. In the IDP entity ID field, paste the IdentityProvider Issuer that you copied in the previous step (see image to the left).
11. In the Name ID format field, select the NameID format that you specified in the Okta console step 2 (for example, urn:oasis:names:tc:SAML:2.0:nameid-format:persistent) (see image to the left).
12. In the Email Claim field, type Email. This must match the “Attribute” name that you configured in the Okta console in step 2. The Email address ensures the correct user is signing in to the management console.
13. Click Save.
14. Open the Authenticator that you added. Copy the Single Sign On URL. This URL will be added to the following fields in the Okta console, SAML Settings screen in a later step:
• Single Sign On URL
• Requestable SSO URLs
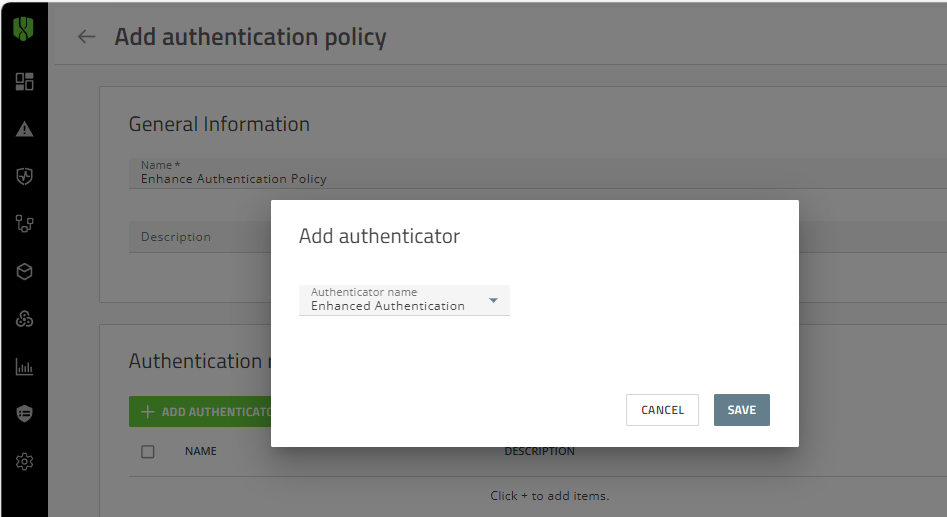
4. Create an authentication policy and assign it to users and groups.
Create a policy that includes the required authenticator for your environment. You can create a user policy or add the authenticator to the default authentication policies for the console, CylancePROTECT Mobile app, or CylanceGATEWAY agent. Assign the policy to one administrator to verify the sign-in policy is functioning as expected. Only one policy type can be assigned to a user. You can then assign the authentication policy to your users.
- On the menu bar, click Settings > User Policy.
- Click the Authentication tab.
- Click Add Policy.
- Enter a name and description for the policy (for example, Enhanced Authentication Policy).
- In the Authenticator rules section, click Add Authenticator. In the Add authenticator dialog box, select the “Enhanced Authentication” authenticator that you created in the last step.
- To create the authentication policy, click Save.
- Assign the policy to one administrator and then verify that the sign in is working as expected. Complete the following steps:
a. In the Assign the authentication policy dialog box, click Yes.
b. Click Add User or Group.
c. Start typing a name to search for the user that you want to add.
d. Select the user from the search results.
e. Click Add.
f. Sign out of the console and access the console sign-in page.
g. Enter the email address of the administrator to which you assigned the authentication policy above and click Sign In.
h. When prompted, enter your credentials from Okta.
i. Complete the sign in with your Okta credentials and verify that the administrator can successfully sign in to the Cylance console.
For more information on additional authentication policy settings, see Create an authentication policy.
Optionally, it is recommended that you create a user policy (User policy > Authentication) that requires only a Cylance console password and assign it to one or more designated administrators. You should use a strong password for the user policy. You can use this policy as a failsafe while you configure Okta to an authenticator.
5. In the Okta console, update the placeholder information in the SAML Custom Connector (Advanced), Configurations.
Replace the placeholder information to allow Okta to communicate with Cylance Endpoint Security.
- Open the SAML app (for example, CylanceEnhancedAuth_Example) that you created in step 1.
- Click the General tab.
- In the SAML Setting section, click Edit.
- Click Next.
- In the Single Sign On URL field, delete the current URL and paste the URL that was generated when you added the authenticator in the step 3 (see image to the left).
• Single sign-on URL
• Other Requestable SSO URLs
- Click Continue to Next Step twice.
- Click Finish.
That’s it!
You have successfully configured an Okta SAML authenticator and assigned the authentication policy to users and groups.
Users can now sign-in to the Cylance console using one of the following methods:
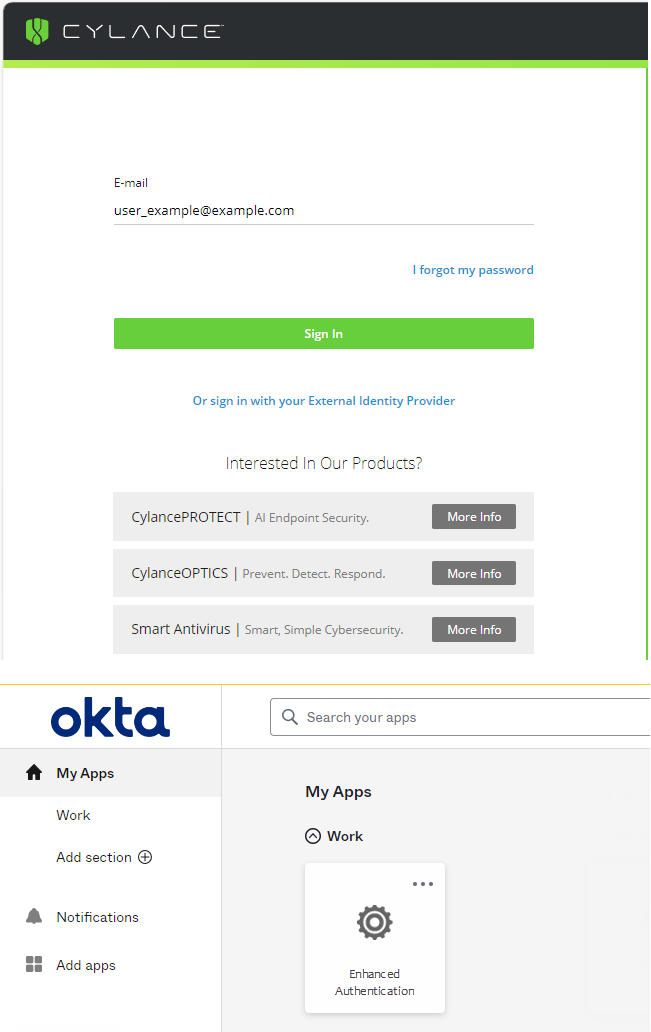
• Cylance console sign in: Go to the Cylance Console Sign-in page and sign in directly using your Okta authentication (see image to the left).
• IDP-initiated sign in: Sign in to your portal and click the CylanceEnhancedAuth_Example app that was created in step 1 to Single Sign-in to the Cylance console (see image to the left).

Next steps: Disable Custom Authentication and assign the policy as necessary
After you have verified that you can sign in to the Cylance console from the primary login page using your IDP credentials, you can go to Settings > Application and clear the Custom Authentication check box.
Sign out and sign in to the Cylance console from the sign-in page using the administrator account with the new authentication policy that was applied in step 3 of this workflow and your IDP credentials.
Warning: Make sure that you sign in to the Cylance console from the primary sign-in page using your Okta credentials. If you test the sign in from the “Or sign in with your External Identity Provider” page and then Disable Custom Authentication, you may become locked out of the console.
If necessary, assign the authentication policy to your tenant or users and groups as necessary.
For more information about configuring Okta to communicate with the Cylance console and allowing users to sing in using single sign on, see the Cylance Endpoint Security Setup Guide.