Azure Active Directory is becoming Microsoft Entra ID.
If you have configured your environment with enhanced authentication, no additional action is required.
You can configure the authenticator using one of the following two methods. BlackBerry recommends that you use the secure method to set up the authenticator for Cylance Endpoint Security. You can configure using the easy method first and switch to the secure method later. However, if you change the configuration method and you have configured your authenticator to require users to validate their email with a one-time code, users will need to validate again the next time that they sign in after the change.
- Easy: This configuration method uses the email address for both identifiers (Federated ID and email address) and is the same configuration that is used by the Legacy method. In this method, the email address is used as an identifier, but has some risk because the email address can be changed for a user, which can cause the authentication to fail.
- Secure: This configuration method provides enhanced security and more options to secure users’ sign-in to the management console. This method requires additional time to set up and uses the following two values to identify users:
Federated ID: The Federated ID is a unique value that is used to link the user in Entra and the management console.
Email address: The Email address ensures the correct user is signing in to the management console. It is obtained from the “email” claim in the SAML response.
If you need to configure your Entra environment for enhanced authentication or want to use the IDP-initiated Proxy feature which allows you to use single sign-on to (SSO) access the Cylance console after logging into Entra ID, you must complete the following steps:
1. In the Entra environment, complete the following:
a. Create a new application.
b. Configure Entra to communicate with Cylance Endpoint Security.
2. In the Cylance console, complete the following:
a. Add a new authenticator.
b. Add an authentication policy.
c. Assign the authentication policy to users.
3. In the Entra environment, update the Reply URL with the SSO Callback URL that you generated in the Cylance console.
This workflow provides an example of how you might configure your Entra environment to communicate with the Cylance console and allow users to sign in to the console using single sign on.
Important: The Entra configuration and the Cylance Endpoint Security authenticator configuration must match the claim names to allow the management console to retrieve the users’ credentials. If they do not match, users cannot sign in to the management console.
In this configuration, you will be required to record information in the Entra portal that is required in the Cylance console to allow Entra to communicate with Cylance Endpoint Security. The following table lists the settings that you will record from the Entra portal and the corresponding setting in the Cylance Console.
The following information will be recorded and must match between the Cylance console authenticator and Entra environment, respectively.
Cylance Console authenticator |
Entra portal |
SSO Callback URL The SSO callback URL is generated when the Authenticator is added. The URL will be in the format of <IDP>/_/resume/saml20/<hash> |
Reply URL |
Login Request URL |
Login URL |
SP Entity ID |
Identifier (Entity ID) |
Email Claim |
Claim ID |
IDP signing certificate |
Base-64 encoded X.509 SAML Signing Certificate |
The following tasks walk you through the Easy configuration method.

1. In the Entra portal, create a new application.
In your Microsoft Entra portal, create an application that will be used to communicate with the Cylance console.
In the image, the numbers correspond to the step number in the procedure; not all steps are represented in the image.
- In the Entra portal, open Enterprise Applications.
- Click New application > Create your own application.
- In the Create your own application screen, type a name for the application (for example, CylanceEnhancedAuth_Example).
Important: If the CylancePROTECT application is displayed and recommended, do not select it. The application provides steps to configure the legacy Custom Authentication which has been deprecated.
- Select Integrate any other application you don't find in the gallery (Non-gallery).
- Click Create.
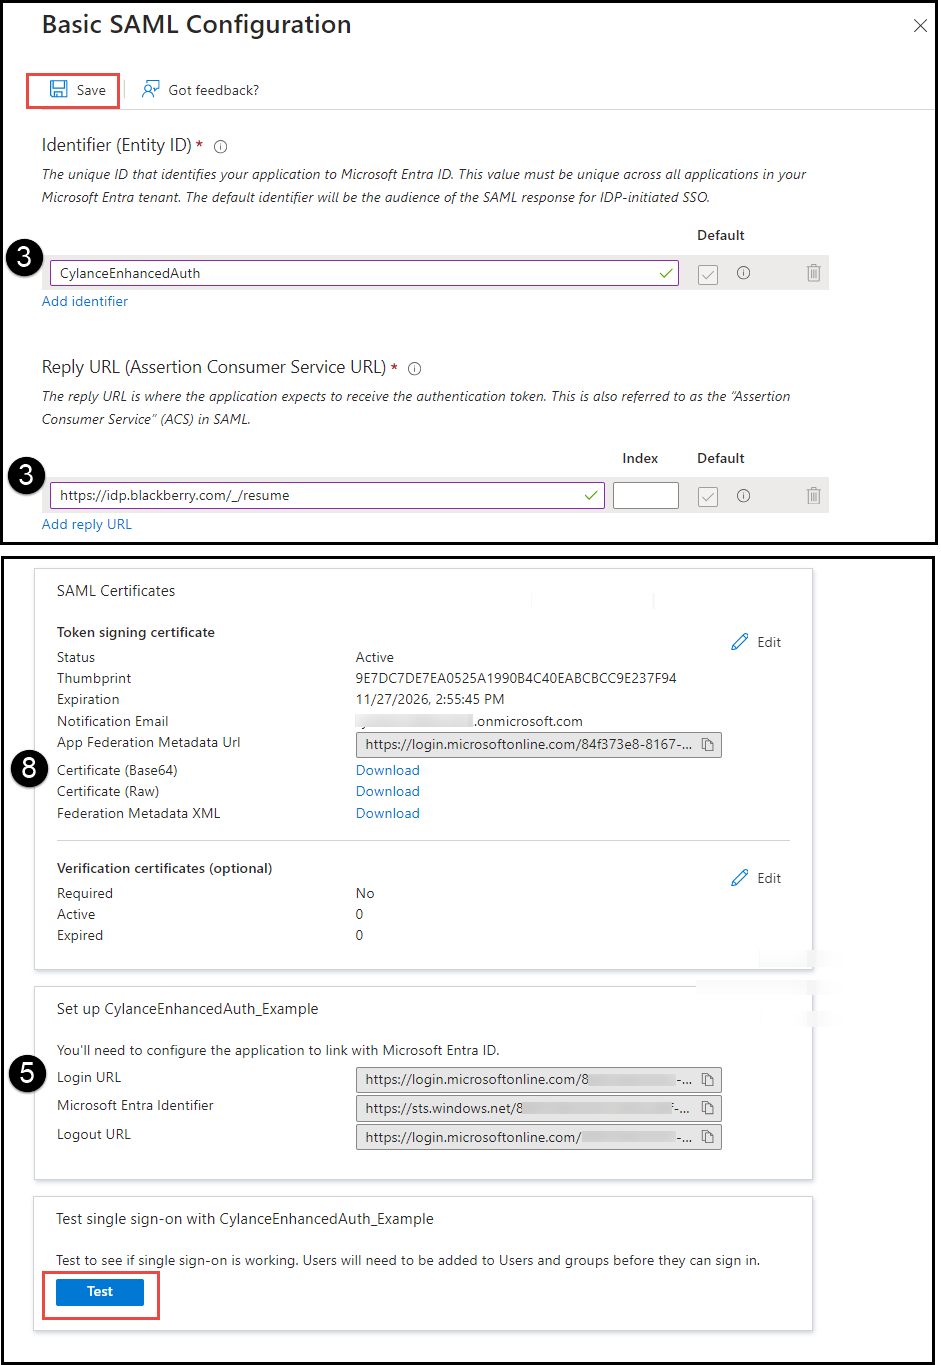
2. Configure Entra to communicate with Cylance Endpoint Security.
The Cylance management console requires all SAML responses to include the user’s email addresses. Important: The email addresses in Entra must match the addresses that are registered in the Cylance management console.
In the image, the numbers correspond to the step number in the procedure; not all steps are represented in the image.
1. In the CylanceEnhancedAuth_Example Overview screen, in the Getting Started section, under Set up single sign on, click Get Started.
2. On the Single sign-on screen, click SAML.
3. On the SAML-based Sign-on screen, configure the Basic SAML Configuration.
a. In the Basic SAML Configuration section, click Edit.
b. In the Identifier (Entity ID) field, click Add identifier and type a unique identifier name (for example, CylanceEnhancedAuth). Record the Identifier (Entity ID). It will be used in the Cylance console, Authenticator configuration “SP Entity ID” field to verify the entity ID in the next step (see image to the left).
c. In the Reply URL (Assertion Consumer Service URL) section, click Add reply URL and enter the placeholder URL, https://ChangeMe.Cylance.com. You can leave the Index blank.
The Single Sign-on URL or “SSO callback URL” will be generated in the Cylance console when you add the authenticator in the next step.
This URL will be updated in a later step. Important: If you do not update the URL, the browser will display an error indicating that the server's IP address could not be found.
d. Click Save. If you are prompted to test the application, click No, I’ll test later.
4. Verify the Attributes & Claims. The SAML response generated by Entra must contain the same email address that is registered with the Cylance console. If necessary, you can update an existing claim or create a new claim. For more information on the SAML claims, see https://learn.microsoft.com/en-us/entra/identity-platform/saml-claims-customization.
5. In the Set up CylanceEnhancedAuth_Example section, record the Login URL (see image to the left). The Login URL will be used in the Cylance console, Authenticator configuration “Login Request URL” field in the next step.
6. Verify that you have assigned the application to one or more users or groups. The application must be assigned to a user to perform the Test in the next step. For instructions, see Assign users and groups to an application. The application that you created in step 1 must be assigned to a user to verify the application and Attributes & Claims.
7. Click Test to validate that the SAML response includes the correct email address and that single sign-on is functioning as expected.
- If the test is successful, expand the claims and record the Claim ID which includes the value of the email address that is registered with Cylance Endpoint Security (for example, http://schemas.xmlsoap.org/ws/2005/05/identity/claims/emailaddress). The Claim ID will be used in the Cylance console, Authenticator configuration “Email Claim” field in the next step.
- If the test fails, follow the onscreen prompts. Complete one of the following:
· Verify that you are using an email address that is assigned to the application that was created in step 1. For example, if you are logged in to Entra using User1@example.com, but the application is assigned to User2@example.com the test will fail. See your Entra documentation on how to assign the application to a user.
· If the Response fails, verify that you have the correct email address and modify the Attributes & Claims as necessary.
· Contact Microsoft to troubleshoot your environment.
8. Download a copy of the Base-64 encoded X.509 SAML Signing Certificate. In the SAML Certificates section, beside Certificate (Base64), click Download. This will be used in the Cylance console, Authenticator configuration “IDP signing certificate” field to verify the certificate in the Authenticator configuration in the next step.
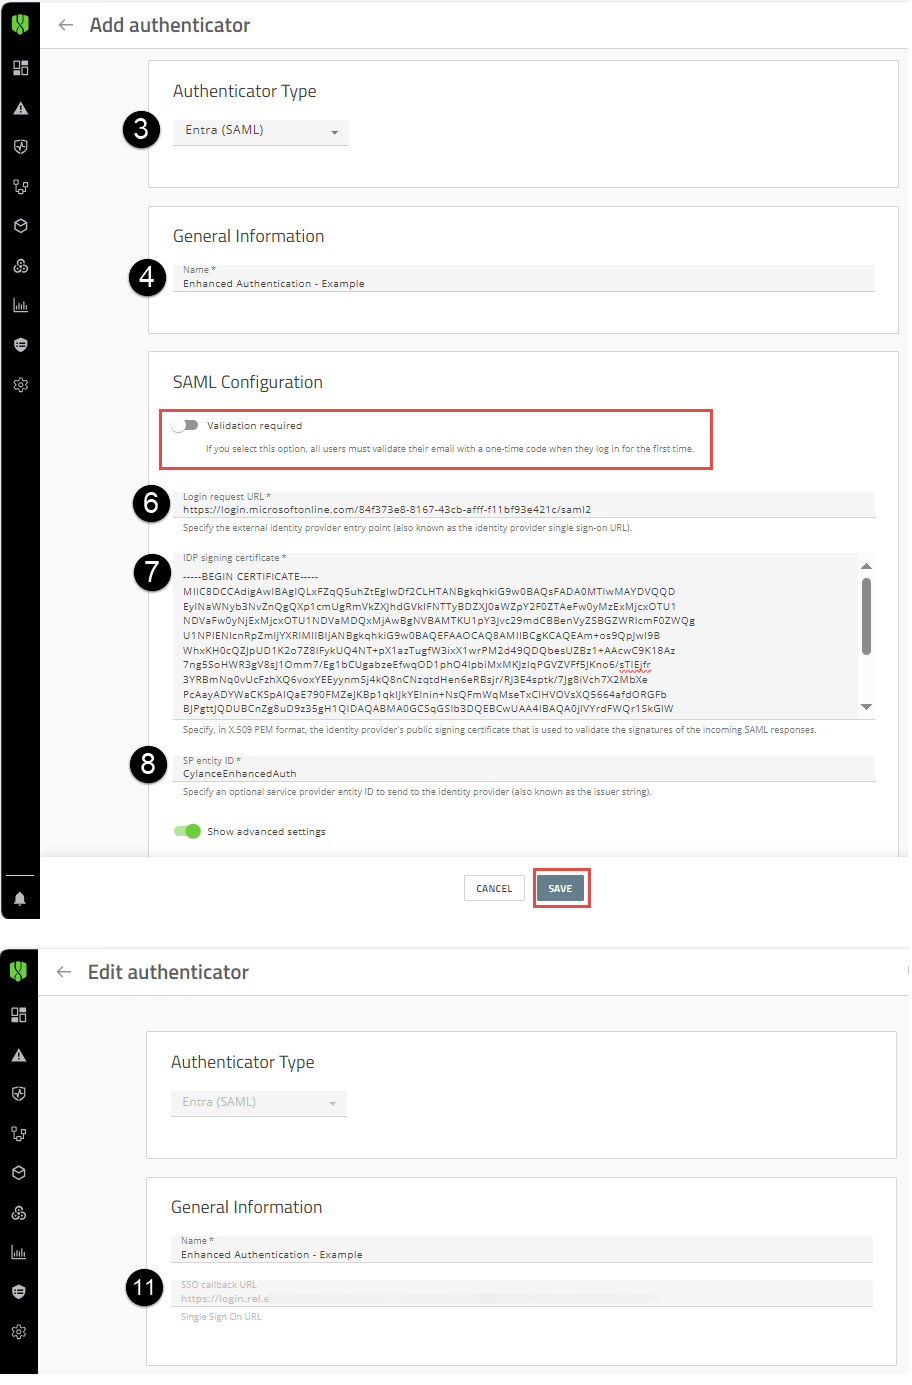
3. In the Cylance console, add the Authenticator.
The Single Sign-on URL or SSO Callback URL is generated when you add the authenticator.
In the image, the numbers correspond to the step number in the procedure; not all steps are represented in the image.
- On the menu bar, click Settings > Authentication.
- Click Add Authenticator.
- In the Authenticator Type drop-down list, select Entra (SAML).
- Enter a name for the authenticator (for example. EnhanceAuthentication).
- Optionally, if you want users to validate their email with a one-time code when they log in for the first time, turn on Validation required. The code is sent to the email address that is associated with the user in your tenant.
- In the Login request URL field, enter the “Login URL” that you recorded in the Entra portal “SAML-based Sign-on” screen in step 2. For example, in the Entra Portal, go to Enterprise Application > CylanceEnhancedAuth_Example > Setting up CylanceEnhancedAuth_Example section > Login URL.
- In the IDP signing certificate field, paste the “Base-64 encoded X.509 SAML Signing Certificate” that you downloaded form the Entra portal. When you paste the body of the certificate, make sure that you don't alter any line breaks or the format of the certificate information (see image to the left).
- In the SP Entity ID field, type the “Identifier (Entity ID)” that you recorded in the Entra portal in step 2. This field is required, and the value that you enter must match.
- Enable Show Advanced settings, in the Email claim field, past the value from the “Claim Name” that you recorded in the Entra portal in step (e.g. http://schemas.xmlsoap.org/ws/2005/05/identity/claims/emailaddress).
- Click Save.
- Open the Authenticator that you added. Copy the SSO callback URL. This URL will be added to the Entra portal, Reply URL (Assertion Consumer URL) field in a later step.

4. Create an authentication policy and assign it to users and groups.
Create a policy that includes the required authenticator for your environment. You can create a user policy or add the authenticator to the default authentication policies for the console, CylancePROTECT Mobile app, or CylanceGATEWAY agent. Assign the policy to one administrator to verify the sign-in policy is functioning as expected. Only one policy type can be assigned to a user. You can then assign the authentication policy to your users.
- On the menu bar, click Settings > User Policy.
- Click the Authentication tab.
- Click Add Policy.
- Enter a name and description for the policy (for example, Enhanced Authentication Policy).
- In the Authenticator rules section, click Add Authenticator. In the Add authenticator dialog box, select the “Enhanced Authentication” authenticator that you created in the last step.
- To create the authentication policy, click Save.
- Assign the policy to one administrator and then verify that the sign in is working as expected. Complete the following steps:
a. In the Assign the authentication policy dialog box, click Yes.
b. Click Add User or Group.
c. Start typing a name to search for the user that you want to add.
d. Select the user from the search results.
e. Click Add. If you are migrating from Custom Authentication, select the Allow Password Login checkbox. This option allows you to log in to the console directly and use SSO. Enable this option to test your SSO settings without being locked out of the console.
f. Sign out of the console and access the console sign-in page.
g. Enter the email address of the administrator to which you assigned the authentication policy above and click Sign In.
h. When prompted, enter your credentials from Entra.
i. Complete the sign in with your Entra credentials and verify that the administrator can successfully sign in to the Cylance console.
For more information on additional authentication policy settings, see Create an authentication policy.
Optionally, it is recommended that you create a user policy (User policy > Authentication) that requires only a Cylance console password and assign it to one or more designated administrators. You should use a strong password for the user policy. You can use this policy as a failsafe while you configure Entra to an authenticator.
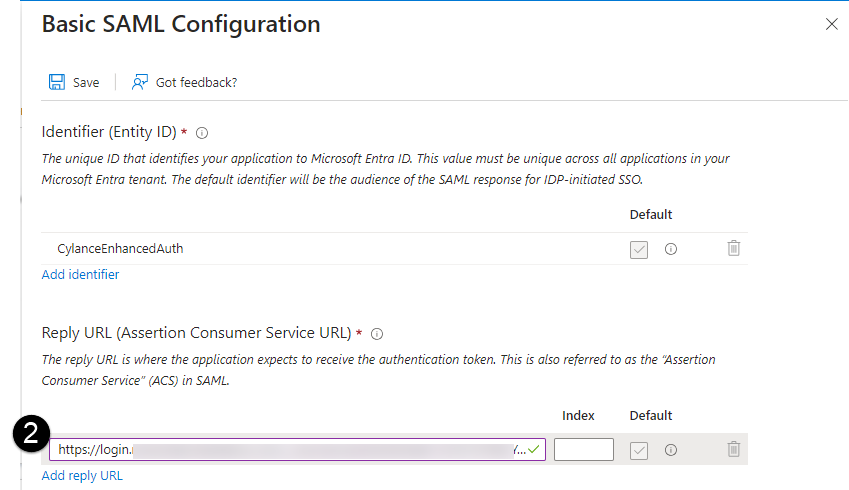
5. In the Entra portal, update the placeholder information in the Basic SAML configurations.
Replace the placeholder information to allow Entra to communicate with Cylance Endpoint Security.
- Open the Basic SAML Configuration that you created.
- In the Reply URL (Assertion Consumer Service URL) field, delete the placeholder URL and paste the SSO callback URL that was generated when you added the authenticator.
If you have more than one Reply URL, must make sure that the Reply URL which includes the SSO callback URL is set as Primary. If the incorrect reply to URL is used, users will be unable to sign in to the Cylance console.
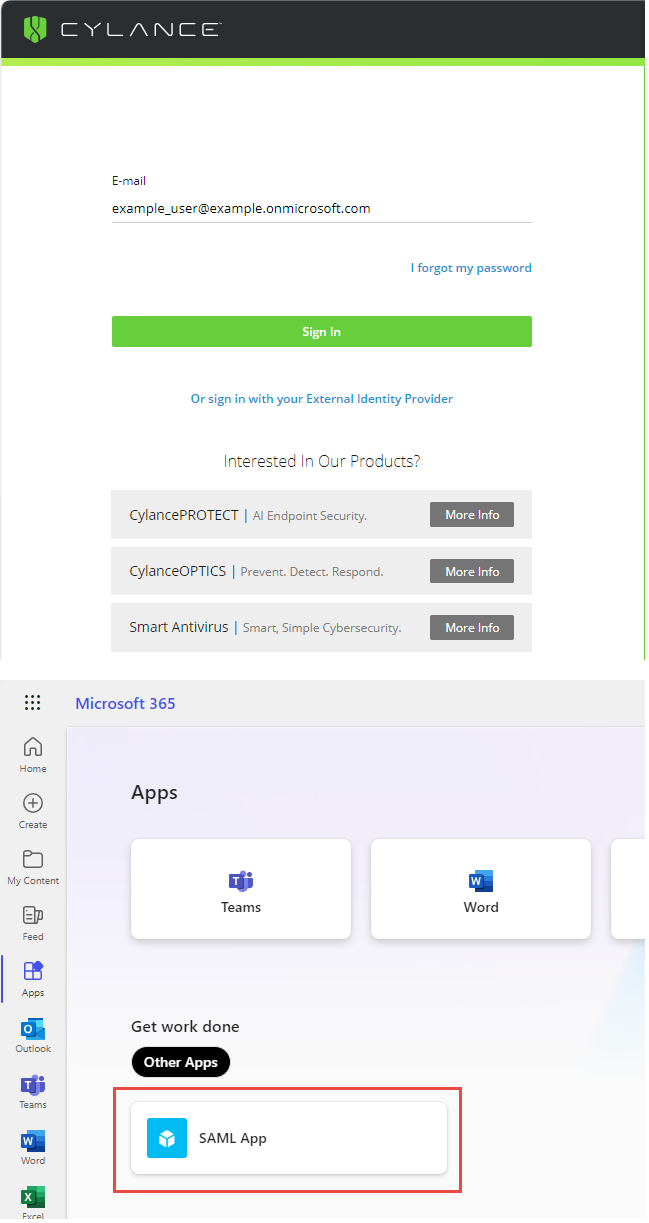
That’s it!
You have successfully configured an Entra SAML authenticator and assigned the authentication policy to users and groups.
Users can now sign-in to the Cylance console using one of the following methods:
- Cylance console sign in: Go to the Cylance Console Sign-in page and sign in directly using your Entra ID authentication (see image to the left).
- IDP-initiated sign in: Sign in to your portal and click the CylanceEnhancedAuth_Example app that was created in step 1 to Single Sign-in to the Cylance console (see image to the left).
Next steps: Disable Custom Authentication and assign the policy as necessary
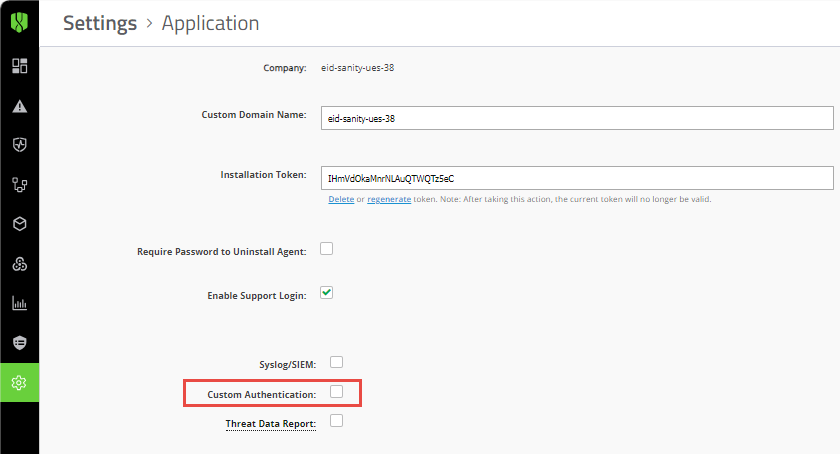
After you have verified that you can sign in to the Cylance console from the primary login page using your IDP credentials, you can go to Settings > Application and clear the Custom Authentication check box.
Sign out and sign in to the Cylance console from the sign-in page using the administrator account with the new authentication policy that was applied in step 3 of this workflow and your IDP credentials.
Warning: Make sure that you sign in to the Cylance console from the primary sign-in page using your Entra credentials. If you test the sign in from the “Or sign in with your External Identity Provider” page and then Disable Custom Authentication, you may become locked out of the console.
For more information about configuring Entra to communicate with the Cylance console and allowing users to sing in using single sign on, see the Cylance Endpoint Security Setup Guide.